
(Note: Some links in this post are affiliate links, and we will be compensated when you make a purchase by clicking through our links. Read our disclosure policy here.)
Each year during the holidays we have a few traditions we love to do as a family to create lasting memories. Here are some of our long standing traditions:
- Make Christmas tree ornaments
- Bake and decorate cookies
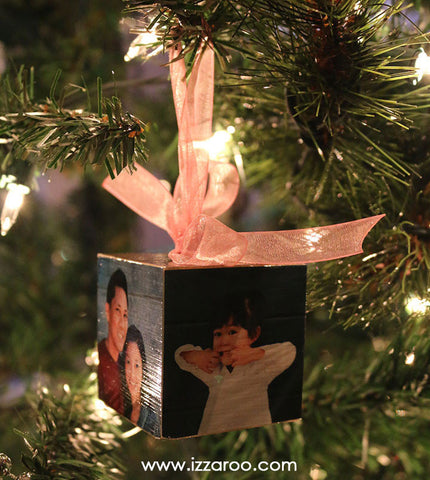
- Make an annual family photo ornament
- Make holiday cards
- Practice giving
- Make small gifts for neighbors and teachers
Of all of these, making ornaments is definitely one of our favorites. While we decorate our tree each year, we love unpacking them and reminiscing over who made what, when.
There are two types of ornaments we love filling our tree with:
- Handmade ornaments
- Ornaments collected from places we’ve travelled (Such a great way to remember fun places we’ve explored together.)
Here are tutorials for all the ornaments we’ve made together!
I Spy Holiday Christmas Ornament Tutorial:


This is my kids’ favorite ornament we’ve made. They love searching for their photos inside each year. We made these for each child as well as for family gifts to give away. I included a photo of each family member inside.
Materials:
-
Hot Glue Gun
- Ribbon or string or twine
- Clear plastic ornaments (I’m not sure where I originally got these ornaments, but they can easily be done with the common circular ornaments easily found at craft stores.)
- Bead assortment
- Card Stock
- Silica beads
Instructions:
- Pour silica beads into ornament
- Add desired bead assortment (Keep track of how many of each bead is added)
- Print small photos. I did mine in a circular shape. Add them inside.
- Seal the top of the ornament with hot glue (you don’t want those tiny beads spilling out!)
- Print out a label with the what’s inside for them to spy.
- Attach the label with your favorite twine or ribbon and you’re done!
DIY Cinnamon Spice Holiday Christmas Ornament Tutorial:
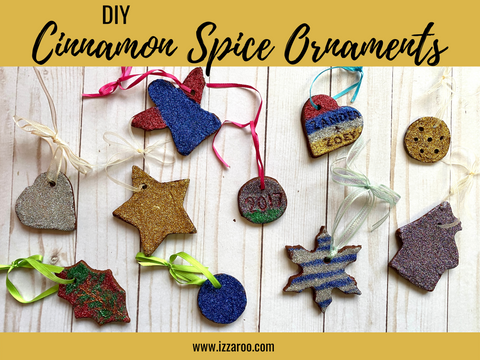
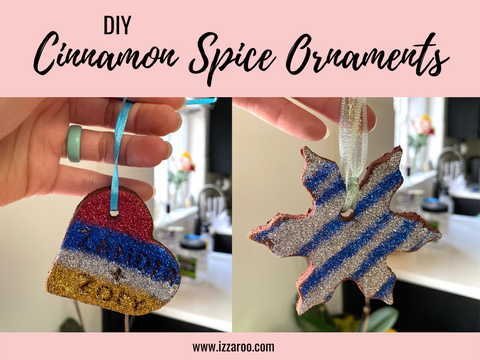
It’s beginning to smell a lot like Christmas. I love the way these ornaments smell and look. This is one of my favorites.
Materials:
Recipe:
- 1 cup cinnamon
- 2 tbsp ground cloves
- 2 tbsp ground nutmeg
- 1 cup applesauce
- 2 tbsp of white glue
Instructions:
- Mix all ingredients until they come together to form a dough. Knead a few minutes until you can form a dough ball.
- Sprinkle cinnamon onto surface to roll out dough.
- Use cookie cutters to cut ornaments
- Use a straw to cut a small hole to insert the ribbon for hanging
- To finish, lay them out on a drying rack for a few days, turning at least once. Or, put them in the oven at 200 degrees for a few hours.
- After they dry, you can leave them as is or decorate them.
- We used a foam brush to paint them with Mod podge and covered them with glitter
- To keep the cinnamon scent longer, store them in a plastic tub to keep them fragrant for many Christmas’ to come.
DIY Shrinky Dink Holiday Christmas Ornament Tutorial:
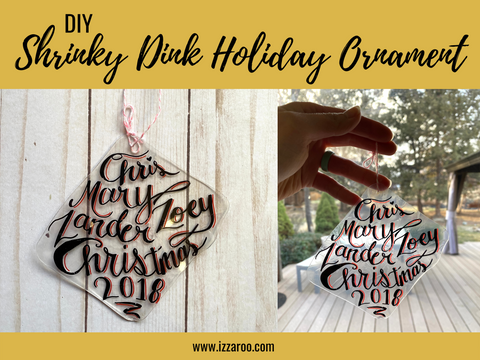
This is a fun throw back to the popular 80’s shrinky dink craze. I used the entire paper, but you could make different shapes for more festive ornaments.
Materials:
Instructions:
- Draw on your shrinky dink paper
- Cut out desired shape
- Use paper hole punch to cut a hole for the ribbon
- Bake according to instructions for shrinky dink
- Add your ribbon
DIY Wood Slice Photo Holiday Christmas Ornament Tutorial:

Materials:
- Wood slices (includes eyelets for adding ribbon)
- Ribbon or string or twine
- Wood burning tool
- Mod podge
- Foam brush
Instructions:
- The wood slice I used didn’t have the eyelet already attached so I drilled holes for the ribbon.
- Use wood burning tool to write your desired name/message/year on the back.
- Cut your photo to size.
- Use foam brush to paint Mod Podge, added photo, add another layer of Mod Podge on top to seal it.
- Add ribbon/twine.
- Note: do not wrap these in tissue to store – they will stick. Instead keep them in a plastic bag or bin.
Wooden Photo Christmas Ornament Tutorial:
- See the full tutorial here
- Note: do not wrap these in tissue to store – they will stick. Instead keep them in a plastic bag or bin.
Pine Cone Owl Ornament Tutorial:

Materials:
-
Pine Cones
-
Felt
-
Pipe Cleaners
-
Hot Glue Gun
- Ribbon or string
Instructions:
- Pick your desired felt colors for the owl. I chose neutral colors, but using bright colors would be fun, too.
- Cut all the felt pieces
- Cut pipe cleaners to size
- Hot glue eyes and beak on to face piece
- Hot glue wing pieces together
- Hot glue assembled face and wings to pine cone
- Hot glue pipe cleaner feet and bend to look like claws
- Tie ribbon or string to top of pine cone to hang from tree
Aquarium Ornament Tutorial:
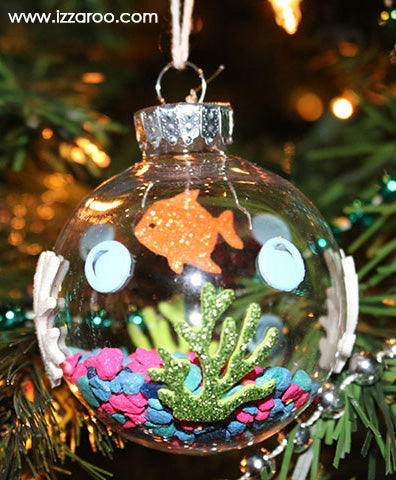
Materials:
-
Clear Plastic Ball Ornament
-
Sea Life Foam Stickers
-
Aquarium Gravel
-
Fishing Line
- Ribbon or string
Instructions:
- Fill plastic ball ornament partially with aquarium gravel
- Use clear fishing line to hang fish sticker
- Decorate the outside of the ornament with sea life foam stickers
- Tie ribbon or string to top of ornament to hang from tree
- Personalize by writing the name of the person who made the ornament and year on the bottom
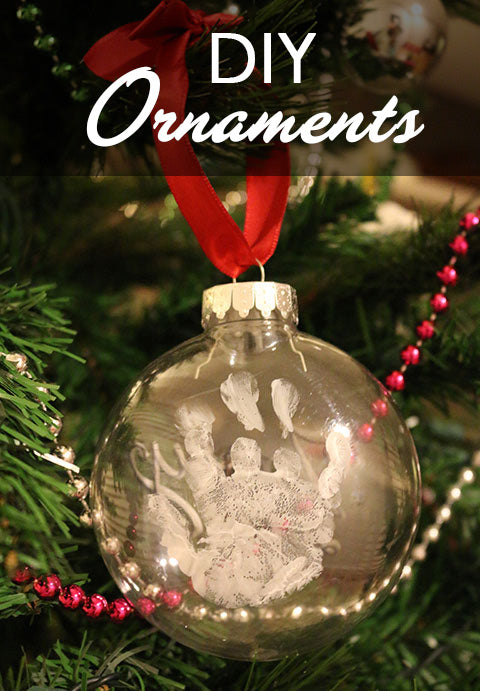
Baby’s First Handprint Ornament Tutorial:

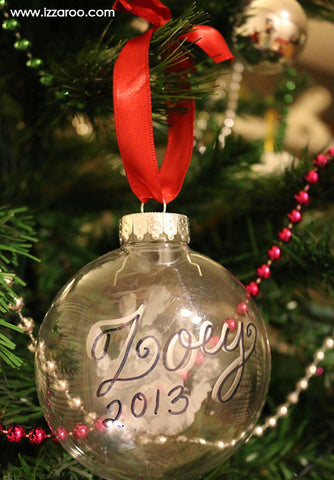
Materials:
-
Clear Plastic Flat Round Ornament
(Find a size that will fit your child’s hand.)
- Permanent Markers. I used Black
and Silver
.
-
Foam Paint Brush
-
White Acrylic Non-Toxic Paint
(or color of choice)
-
Clear Acrylic Sealer
Instructions:
- Paint your child’s hand using paint and brush.
- Try your best to get a clear handprint. If it smudges you may have time to wipe it clean and try again so keep wipes handy.
- Let dry.
- Use permanent markers to write your baby’s name and date on the opposite side.
- Spray clear acrylic sealer to preserve the ink.
- Tie ribbon or string to top of ornament to hang from tree
Initial Button Ornament Tutorial:
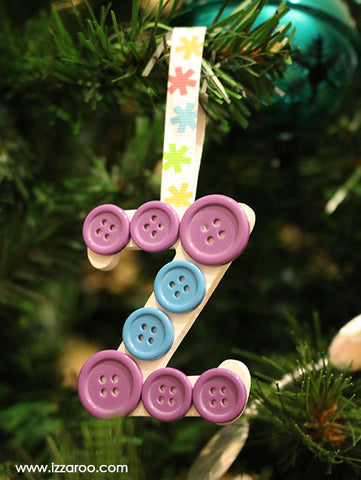
Materials:
-
8cm Wooden Letters
-
Buttons
-
Hot Glue Gun
- Ribbon or string
Instructions:
- Hot glue buttons onto wooden letter
- Hot glue ribbon/string onto wooden letter to hang from tree
- Personalize the back by writing the person’s name and year the ornament was made
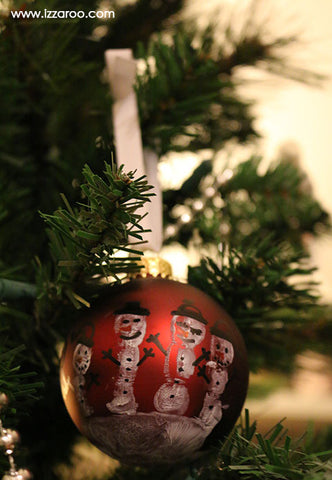
Snowman Handprint Ornament Tutorial:
Materials:
-
Red Ball Ornament
-
Black and Orange
Permanent Markers
-
Foam Paint Brush
-
White Acrylic Non-Toxic Paint
-
Clear Acrylic Sealer
- Ribbon or string
Instructions:
- Paint your child’s hand with white paint
- Place an ornament in the palm of your child’s hand, and have them close their fingers over the ornament.
- Put ornament aside to dry (Tip: Egg cartons work great to keep them from rolling while drying.)
- Once the paint is dry, add details like buttons, hat, face, arms, scarves, etc., using permanent markers
- Personalize by writing the name of the person who’s hand is on the ornament and year on the bottom
- Spray clear acrylic sealer to preserve the ink.
- Tie ribbon or string to top of ornament to hang from tree
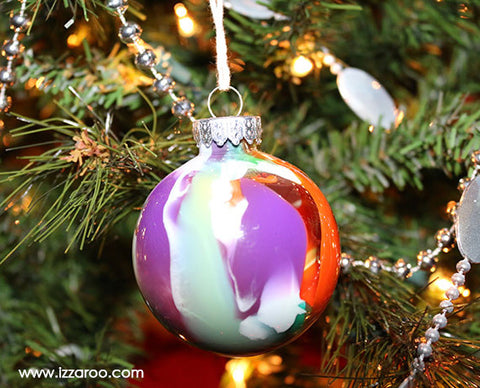
Marble Paint Ornament Tutorial:
Materials:
-
Clear Plastic Ball Ornament
-
Multi-Color Acrylic Paint
- Ribbon or string
Instructions:
- This one’s pretty self explanatory. Squeeze some paint inside the ornament and swirl around until you get your desired look.
- Personalize by writing the name of the person who made the ornament and year on the bottom
- Tie ribbon or string to top of ornament to hang from tree
There you have it. Fun ornaments you can easily make with your kids. I hope this inspires you to make a few this season and create lasting memories.
Your turn, what are some ornaments you’ve made with your kids?! We’re always looking for new ideas every year. We’d love to hear your ideas in the comments below.
To see some of our fun video tutorials, check out our YouTube channel.
It takes intentionality to create memories. Use our digital planning products to help you carve time for making epic memories.
 |
 |
 |
 |


Leave a comment